

How To Loosen Draw Weight On Compound Bow
So you lot have a recurve bow and you lot are finished installing all the parts that came with information technology. But now what? Here are all the details you might not notice in the manual to get your bow shooting to information technology's full potential.
ILF risers are more adjustable. If you exercise non accept an ILF riser some of the following info may not apply to your bow.
Y'all will need to begin by assembling and stringing your bow. You lot should already have your arrow rest installed. Following these steps in club will go the best results.
Set the caryatid summit

The brace height is the distance between the string and the valley of the grip. The brace height determines the specific point at which the arrow separates from the string during the shot. There is a "sweet spot" where the bow performs best. The manufacturer provides a recommended caryatid height range for each bow.
To set or adjust the caryatid height you lot will need to add or remove twists from your string . Offset measure the current brace peak. If it is not within the recommended specs, unstring the bow and add twists to increase caryatid tiptop , or remove twists to decrease brace tiptop . If you lot need to adjust the brace by more than 1/2″ to get information technology into the recommend range, I highly recommend getting a new string of a length that is more appropriate for your bow.
With the brace in the middle of the recommended range shoot a few arrows. Feel for vibrations and listen to the audio it makes. You tin try the bow with different brace heights in increments of 1/8″ to ane/4″ in both directions. The brace acme that feels and sounds the best, equally long as it is inside the manufactures recommended range, is a good starting point. You can fine melody the caryatid elevation past following my guide on brace height optimization in my article "An Olympic recurve tuning method like none other"
Tiller
Tiller is the specific arc of the limb as it bends. If you lot take an ILF bow, it volition shoot more efficiently if you tailor the tiller to your finger placement and claw force per unit area on the cord. If you shoot split finger hook, try starting with a i/4″ positive tiller . That ways you want the summit limb tiller measurement to be ane/4″ greater than the bottom tiller measurement. If you shoot three nether hook, try starting with an fifty-fifty tiller measurement.

On an ILF bow, screwing the limb bolts in or out will suit the tiller. Caution: there is a maximum number of turns y'all can safely unscrew a limb bolt. Cheque your transmission for the maximum number of allowable turns.
Earlier adjusting tiller set the limb bolts to their median setting. Beginning, loosen the limb bolt lock screws. 2d, spiral the limb bolts all the way in. Third, back both the limb bolts out evenly to one-half the maximum allowable turns. 4th, tighten the limb bolt lock screws.
To find the tiller, measure perpendicularly from the cord to the base of the limb, merely past the end of the riser on both the meridian and bottom.
To adapt tiller, y'all will take to tighten or loosen one or both limb bolts. Past tightening the limb commodities you will decrease the tiller measurement. By loosening the limb commodities you will increase the tiller measurement. Tightening only one bolt volition slightly increase the draw weight while loosening but ane will slightly decrease draw weight. Adjust the limb bolts as desired until you have the correct tiller for your way of claw.
Centering the string (Limb Alignment)
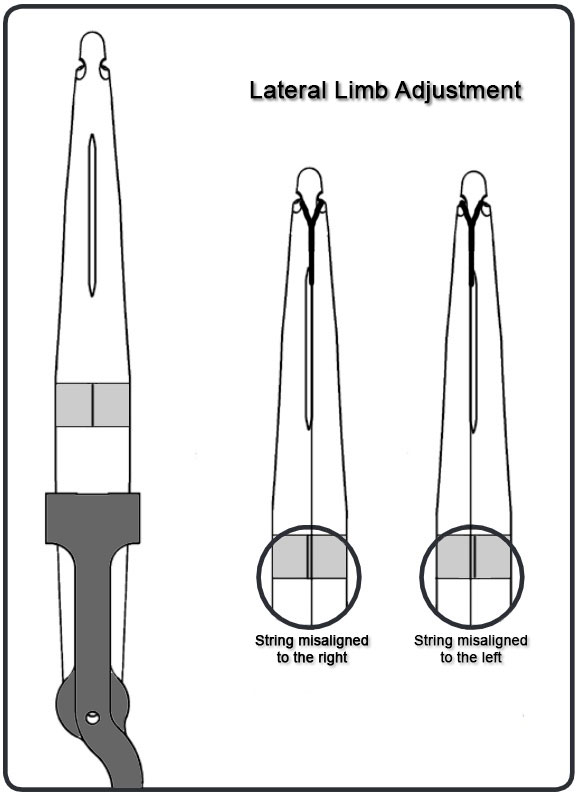
Your string should be aligned directly downwardly the center line of your riser and the base of your limbs. To check the lateral alignment (left / right) I highly recommend using Beiter limb line gauges. (aka Beiter blocks) If y'all do not have beiter gauges you tin employ masking tape. Place a piece of masking tape on the elevation limb about 1" above the riser, and some other piece of masking tape on the bottom limb about 1" below the riser. Measure the width of the limb and draw a line on the masking tape down the exact center of both limbs.
Now string your bow.
To bank check the alignment of the string with a front stabilizer, install your stabilizer and put your bow in a bow vise or rest information technology vertically on on the dorsum of a chair.
Stand directly behind the bow and embrace your non ascendant eye with your paw. Align yourself so you see the string running down the heart of your stabilizer. Exercise not move your head position, and but with your eyes, look up to the top Beiter block. Then move your heart sight dorsum to check the cord alignment with the stabilizer. Then look downwardly to the bottom Beiter block. Repeatedly move from stabilizer to top limb then back to stabilizer and downward to the bottom limb until you feel confident you are seeing how the string aligns with th the limb judge while simultaneously centered on the stabilizer.
If the string does non simultaneously line upward down the verbal center of the stabilizer and the limb gauge lines at the same time, your limbs are misaligned.
ILF risers have rotational/lateral limb adjustments. Depending on the bow there volition exist aligning screws or aligning shims/washers. Make minor changes to 1 limb at a time and recheck alignment. Move the limb tip in the opposite direction the string is misaligned i.e. if the string is misaligned to the right, movement the limb tip to the left. Make small adjustments until the cord is straight centered on the stabilizer/tiller bolt hols and both limb gauges at the same fourth dimension.
The stabilizer is used as a reference to ensure that y'all are looking direct behind the centre aeroplane of the bow. Unfortunately however, there is a possibility of a few inherent problems by using a stabilizer. We tin can not guarantee the stabilizer rod is directly, or the stabilizer is glued into the mounting sleeve perfectly, or the stabilizer mounting bolt is perfectly directly, or fifty-fifty the stabilizer busing in the bow is aligned admittedly strait and truthful with center plane of the bow. For years I have been struggling with a good method that does not require the use of the stabilizer. I believe I take come up up with a solution. For my personal string alignment method click here
Remember to re-tighten all lateral limb alignment prepare screws after any adjustments.
Check for limb twist

To bank check the limb twist first string the bow. With the bow pointing towards the ground, sight down the entire length of the bow from limb tip to limb tip. Adjust the bow so that visually the cord is aligned down the middle of the belly of the limbs (the side of the limb you run across while you are shooting). Look at the left/right alignment of the tip closest to you in relation to the back of the limb (the side of the limb that y'all do not see when you are shooting). If the tip leans/points right or left, the limb is twisted. All limbs take some amount of twist. It is possible to have twist and then slight is is ephemeral to the human heart. In the photo higher up the limb has a very slight amount of twist, this amount is more than acceptable.
If you can see the twist, some articles recommend you remove twist by adjusting the lateral limb alignment.

Doing this yet, will upset the centering of the string. I personally believe having the string centered is extremely of import, so I practice not recommend trying to correct limb twist . You will have to make up one's mind if you want to tolerate the twist or try to correct it. If the twist is uncommonly bad, I recommend replacing the limbs!
Some manufacturers like Hoyt, have aligning studs to counter the limb twist without irresolute the cord alignment.
Draw weight
ILf bows likewise accept adjustable draw weight. Generally you will accept up to 10% of adjustment. The draw weight listed on the limb is frequently the median describe weight for that pair of limbs. Once tiller is prepare take a draw weight measurement. To increase describe weight, tighten both limb bolts evenly. If yous practise not adjust the pinnacle and bottom exactly the same amount, you volition change the tiller . To decrease draw weight, loosen both limb bolts evenly. Remember, exercise not back out the limb bolts beyond the maximum allowance.
Later tiller and draw weight are gear up, recheck the brace elevation and arrange if necessary.
Nock locator installation
First of all, I highly recommend using 2 tie on nock locators. The brass crimp on nock locators are heavy and can cause excessive string oscillation and reduced efficiency. I use a minor slice of serving for my nock locators. I recommend using an equal or larger diameter serving than the one used for the middle serving on the cord . If the material used for the nock locator is too thin information technology can wedge between and split the strands of the center serving.
The height of where you necktie on the nock locator is crucial for tuning. I also mentioned this in my previous post "10 mutual mistakes that ruin accuracy, and how to fix them". If you are shooting divide finger, beginning the top locator at three/8″ above the rest height. If you lot are shooting three under, start the top locator at 1/2" in a higher place the arrow rest. The concluding placement will be adamant when you lot arrow tune.
 A skilful tie on nock locator will stay in place but is as well adjustable. They are not very difficult to tie. Start with at least 12″ of serving, I adopt to wax to the strand to keep information technology from untying. I tie a series of overhand knots.
  Tie the starting time knot at the height y'all want then tie v more knots moving towards the limb tip. Alternating tying one knot on the tiptop of the string then the next beneath the string. Once you get vi total, cut the excess off leaving 1/8″ tails. With a lighter melt the tails into the knot. Exist extremely conscientious non to burn the string or the serving under the nock locator. Concord the string parallel to the ground. Utilize simply the base of operations of the flame and always hold the flame to a higher place the string. Do this for the top and bottom nock locator. The bottom locator should be tied simply below the arrow nock. I do not recommend leaving a gap betwixt the bottom of the pointer nock and the bottom nock locator.
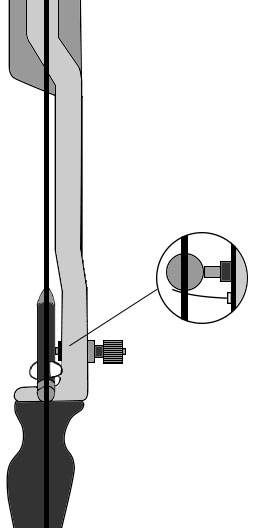
Cushion plunger installation
If you accept an ILF bow with a cut by center riser y'all should be using a cushion plunger. Commencement by installing the medium tension spring in the plunger and set the plunger tension to it'south center position. for now set the depth of the lock neckband then that the plunger sticks out past the riser just a little. You will be adjusting the depth during the arrow alignment.
Arrow alignment
Looking at the bow from backside, visually line upwards the string down the middle of the limbs and look at the pointer shaft position in relation to the string. I personally recommend a perfectly centered alignment, where the center of the pointer is aligned with the middle of the cord and bow.
Residual alignment
Conform the arrow rest arm so the end of the arm lines upwardly somewhere betwixt the centre and outside edge of the arrow shaft. If you do not utilise a clicker, you lot may want to have more of the rest arm sticking out by the arrow shaft.
Next, adapt the rest arm up or down until the absorber plunger is centered on the side of the shaft of the pointer (Se epitome to a higher place for rest and plunger alignment).
Initial sight alignment
Start by aligning the sight discontinuity directly over the center of the arrow shaft.
Completion
At this bespeak your bow is initially set and I recommend you movement on to arrow tuning. If you are unsure about arrow tuning, please experience free to cheque out my newest guide: Arrow tuning 102 A "next level" recurve pointer tuning method
If you have whatever tuning tips or tricks that I did not mention here, I would love to hear about them. Please leave a comment beneath with your tuning tip.

Source: https://understandingarchery.wordpress.com/2017/11/02/how-to-set-up-and-tune-your-recurve-bow-all-the-secrets-they-dont-tell-you/
Posted by: lynnbereest.blogspot.com
0 Response to "How To Loosen Draw Weight On Compound Bow"
Post a Comment